

Painting a brick house white is the process of coating exterior masonry with a breathable, alkali-resistant system to deliver a clean, modern look that lasts. The right prep and products prevent trapped moisture and peeling. Serving Milton and Mississauga, Home Painter Services handles assessment, washing, priming, and pro application tuned for Canadian seasons.
By ZIKRIA MUJAHID — Home Painter Services
Last updated: 2026-06-15
Overview & Table of Contents
White-painted brick looks timeless when prep, breathable products, and climate-aware timing align. This complete guide covers what it is, why it works, pros and pitfalls, the exact step-by-step process, and local scheduling for Milton homes. Use it to plan confidently or brief your contractor for a durable, even finish.
- What is white-painted brick?
- Painting a brick house white: pros and trade-offs
- Step-by-step: from wash to final coat
- Paint vs. limewash vs. stain
- Best practices for cold climates
- Tools and resources
- Local climate & scheduling (Milton)
- Maintenance plan that actually works
- Common mistakes to avoid
- Mini case studies from our crew
- FAQ
- Conclusion & next steps
What Is Painting Brick White?
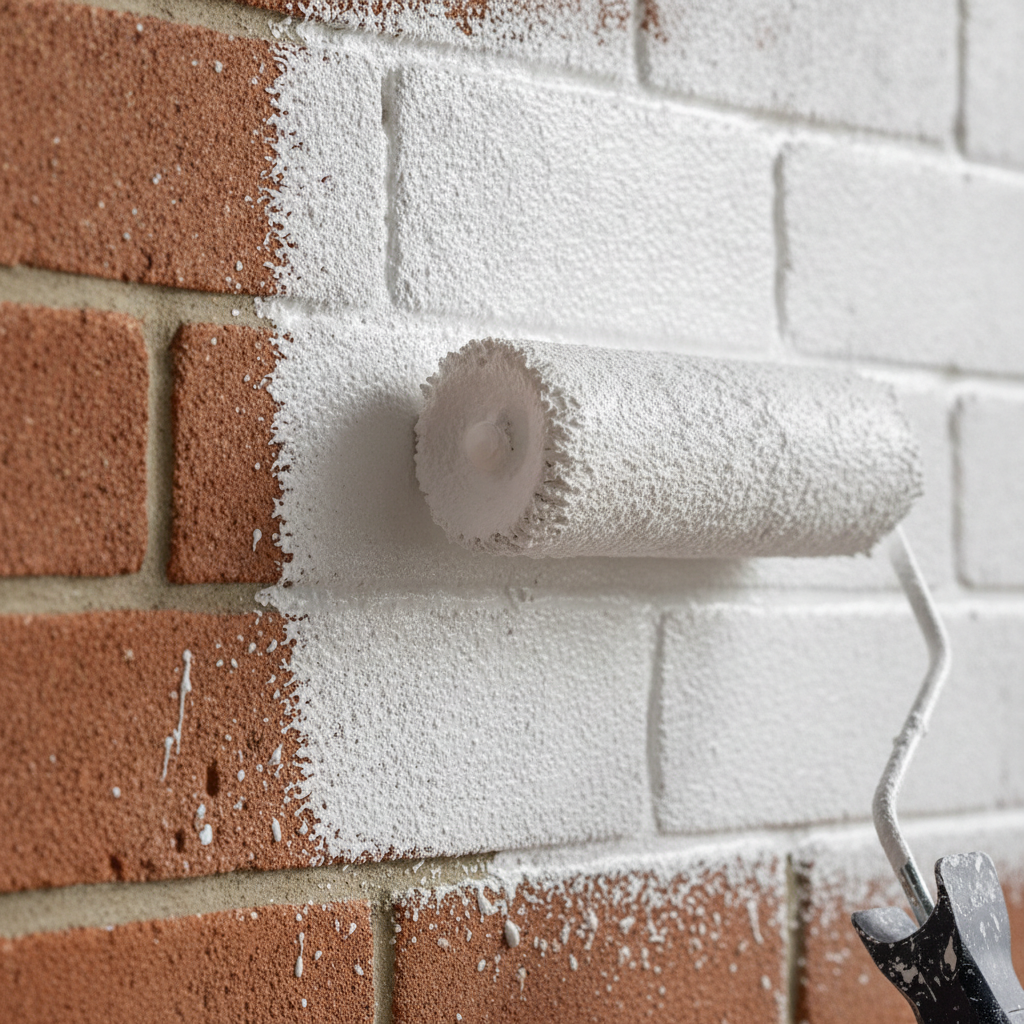
Painting brick white means installing a breathable, masonry-rated system—deep clean, repairs, alkali-resistant primer, and two compatible topcoats (acrylic or mineral-silicate). The objective is a uniform white finish that bonds to porous brick, sheds bulk water, and allows vapor to escape to reduce peeling risk.
Brick behaves differently than wood or siding. It is porous, alkaline, and varies in absorption from course to course. That is why systems win over single products: cleaning removes contaminants; primer deals with alkalinity and porosity; thin, even finish coats build protection and color without suffocating the wall.
In our experience painting exteriors across Milton and Mississauga, long-term success tracks back to moisture control. When masonry is painted damp, the vapor pressure pushes outward and blisters the new film. Dry substrate, breathable chemistry, and patient sequencing are the three pillars of a durable white-brick finish.
Painting a Brick House White: Pros and Trade-Offs
White-painted brick delivers instant curb appeal, visual unity across additions, and a brighter façade. The trade-off is maintenance commitment: you’ll clean more visibly and eventually recoat. With breathable coatings and solid prep, upkeep stays predictable and far less frequent.
Why homeowners choose it:
- Timeless curb appeal: Crisp white modernizes dated reds/oranges and harmonizes mixed batches from additions.
- Design flexibility: White brick pairs beautifully with black windows, cedar accents, and warm shingles.
- Subtle comfort gain: On sunny exposures, higher reflectance can modestly limit surface heat buildup.
- Surface protection: Coatings help shed water and can reduce minor spalling at splash zones.
Trade-offs to weigh:
- Upkeep visibility: Dust and splashback show sooner on light surfaces, especially near grade.
- Commitment: Unlike stain or limewash, paint is harder to reverse later.
- Prep standard: Efflorescence, hairline cracks, and failed caulk must be addressed first.
If you like the look but want more flexibility, consider limewash or masonry stain. Both allow the brick’s texture to stay expressive and are easier to refresh or adjust later.
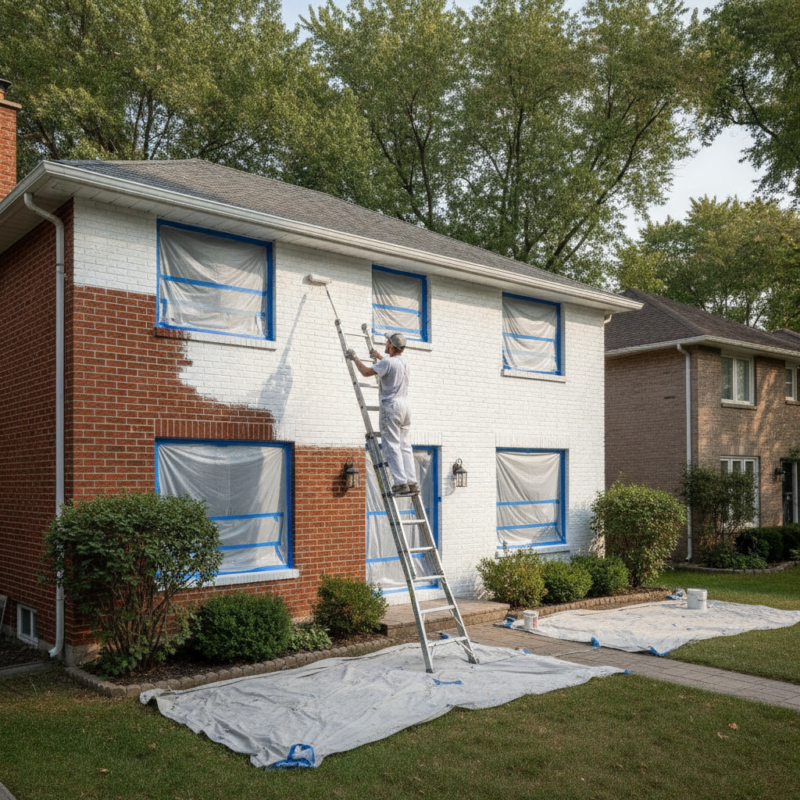
How the Process Works: Step-by-Step
Follow a disciplined sequence: assess and test moisture, deep clean, repair mortar and caulk, block stains, prime with an alkali-resistant masonry primer, then apply two thin, even topcoats. Respect dry times and avoid rain/freeze windows to ensure strong adhesion and uniform sheen.
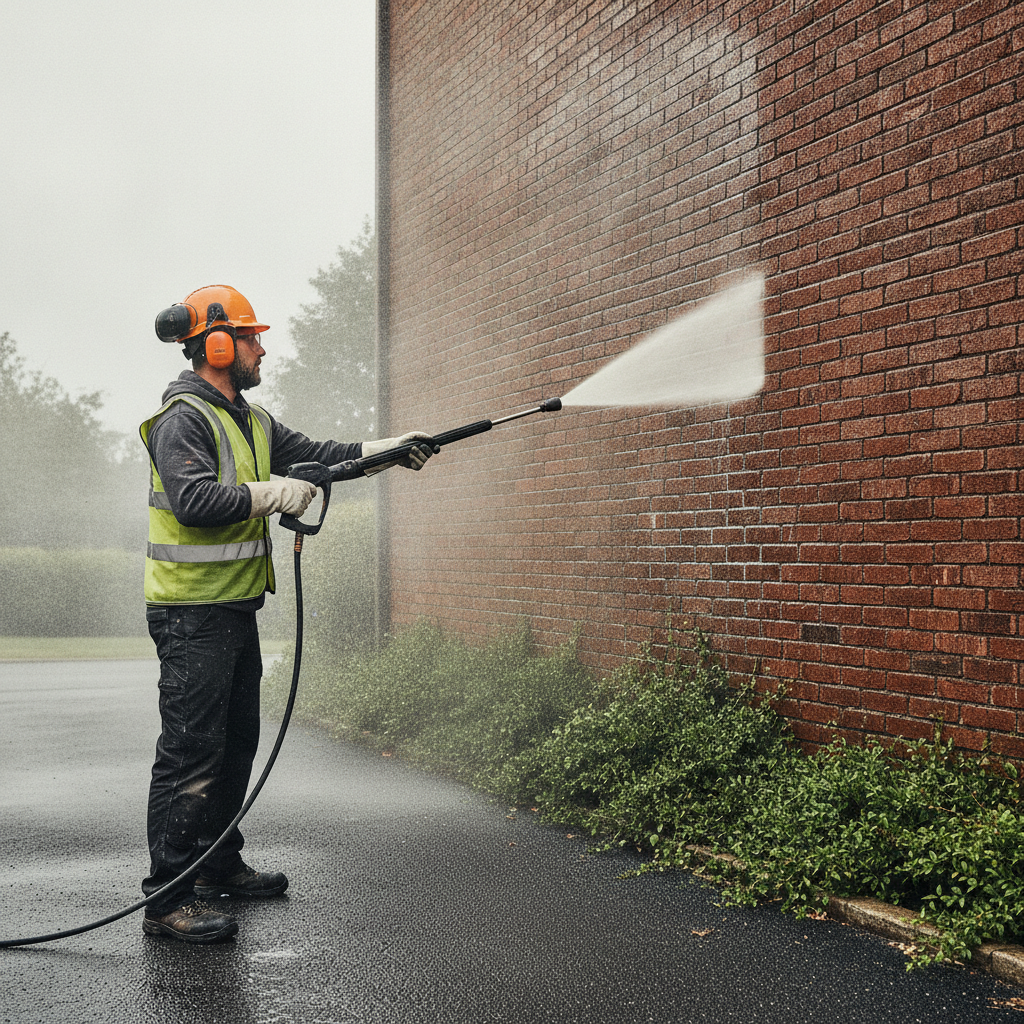
- Assessment & testing: Identify previous coatings and test moisture with a meter. Map failing mortar, leaky gutters, and grade issues directing water to the wall.
- Deep cleaning: Wash carefully with low-to-moderate pressure; use masonry-safe cleaner for mildew, soot, or chalking. Rinse thoroughly.
- Repairs: Repoint failing mortar; fill minor cracks; replace brittle exterior caulking at penetrations and sills.
- Stain blocking: Spot-prime rust or water marks with a masonry-rated stain blocker to prevent bleed-through.
- Priming: Apply an alkali-resistant masonry primer to even out porosity and lock down dust.
- Finish coats: Install two breathable coats—100% acrylic masonry paint or mineral-silicate—back-rolling to seat paint into joints.
- Detailing: Cut crisp lines at soffits and trim; mask meticulously; back-brush into textured areas.
- Final cure: Allow full cure before any aggressive cleaning or hardware reattachment.
For homeowners planning DIY washing or prep, a solid outdoor checklist helps you stage gear and safety. See this concise exterior prep checklist to frame your plan before priming.
Paint Types, Limewash, and Stain Compared
Choose among acrylic masonry paint for a crisp, opaque look; mineral-silicate paint for a mineral-matte finish and superb vapor permeability; limewash for a soft, patinated vibe; or masonry stain for semi-transparent color that preserves texture. Match appearance, breathability, and maintenance expectations.
| Method | Look | Breathability | Maintenance | Best For |
|---|---|---|---|---|
| Acrylic masonry paint | Opaque, uniform white | High with proper system | Wash; eventual repaint | Modern, consistent color |
| Mineral-silicate paint | Opaque, mineral-matte | Very high (chemical bond) | Longer intervals | Historic or damp-prone walls |
| Limewash | Soft, chalky patina | Excellent | Recoats/patina changes | Old-world texture |
| Masonry stain | Semi-transparent | Excellent | Periodic refresh | Keeping natural texture |
Product selection should reflect wall condition and exposure. South- and west-facing elevations weather fastest. Where overspray risk is high near driveways or decks, set wind screens and mask thoroughly to protect adjacent finishes.
Best Practices for Durable Results in Cold Climates
In cold climates, success depends on substrate dryness, breathable systems, and shoulder-season scheduling. Aim for several rain-free days, surface and air above label minimums, low wind, and a safe dew point spread. Thin coats bond better and flex with seasonal movement.
Climate-smart rules we follow
- Wait after rain: Give brick 24–48 hours to dry (longer in shade or high humidity).
- Mind the dew point: Keep surface temperature at least 5°F (≈3°C) above dew point to avoid condensation.
- Respect temperature ranges: Stay within label limits—often 50–90°F (10–32°C) for waterborne systems.
- Block future efflorescence: Fix gutters/grade that push water through walls and into salts.
- Use thin coats: Two thin passes outperform one heavy coat for adhesion and sheen uniformity.
Heat and direct sun shorten open time and can cause lap marks. For a deeper primer on temperature’s influence on coatings, review this overview of temperature-related paint issues before you schedule.
Tools, Materials, and Resources
Successful white-brick projects blend the right washing gear, repair materials, and breathable coatings. Expect a gentle washing setup, mortar repair and caulking materials, alkali-resistant primer, and two compatible topcoats—plus quality brushes/rollers, ladders, and protection for landscaping and hardscapes.
Core kit for clean results
- Washing: Adjustable nozzle or pressure washer on low-to-moderate setting; masonry-safe detergent; soft bristle brushes.
- Repairs: Mortar repair products, exterior-grade caulk, and small crack fillers compatible with masonry.
- Primer & paints: Alkali-resistant primer and breathable acrylic or mineral-silicate topcoats.
- Application: 3/4″ nap rollers, angled brushes, extension poles, and back-brushing tools.
- Access & safety: Stable ladders, planks, or scaffolds; masks, gloves, eye protection.
- Protection: Drop cloths, plastic sheeting, tape; gutter diverters to control splashback during washing.
Planning your toolkit? For a homeowner’s refresher on dry-weather setups and accessory choices, skim this guide to tools for painting in dry areas—many concepts carry over to masonry work.
Local Climate & Scheduling in Milton
In Milton within the Regional Municipality of Halton, aim for stable, dry stretches—late spring through early fall—for washing, priming, and two topcoats. The target is dry masonry, moderate temperatures, and clear skies for several days so each stage cures cleanly without weather delays.
Local considerations for Milton
- Plan staging near Tremaine at Bergamot to streamline setup and reduce neighborhood disruption.
- Spring and fall often offer ideal temperature windows; brief summer storms can compress dry-time margins.
- When families frequent Walker Park, we stage washing/painting times to keep play areas undisturbed.
We coordinate start times with homeowners to protect gardens and hardscapes. Pre-marking hose routes and masking zones prevents accidental plant damage during wash and paint days.
Maintenance Plan That Actually Works
A simple maintenance rhythm—gentle annual washing, quick touch-ups at splash zones, and seasonal checks of caulk and gutters—keeps white brick bright. Light, regular care prevents small issues from becoming big repaints.
Adopt a seasonal cadence:
- Spring: Inspect for winter salt stains near grade; gently wash; test gutters/downspouts.
- Summer: Spot clean splashback areas; refresh caulk where UV and heat stress joints.
- Fall: Clear leaves; confirm positive grade; touch up high-traffic zones before freeze–thaw.
- Winter: Avoid aggressive washing; visually monitor for ice-related staining.
Where driveways or decks meet brick, coordinate care. For example, after deck sanding or deck staining services, stage protective sheeting to shield freshly painted masonry from airborne dust or overspray.
Common Mistakes to Avoid (Where Projects Fail)
Most failures start before the first coat: painting damp brick, ignoring efflorescence, skipping alkali-resistant primer, or laying on thick, rushed coats. Fix moisture paths, prime correctly, and build thin, even films to avoid peeling and blotchy sheen.
- Painting over moisture: Brick that “looks dry” can still read wet inside. Use moisture meters and wait.
- Skipping efflorescence removal: Salts break adhesion and telegraph through white paint.
- No alkali-resistant primer: Leads to uneven sheen and early failure in high-pH masonry.
- Over-rolling thick coats: Heavy passes skin over and trap vapor; thin coats bond better.
- Rushing weather windows: Rain, dew, or hot sun at the wrong time ruins uniformity.
- Poor masking: Overspray or roller spit on shingles, windows, or pavers is costly to correct.
One more avoidable pitfall: mismatched products. Keep primer and topcoats within the same system family whenever possible to ensure compatibility.
Mini Case Studies from Our Crew
Real homes show how moisture, prep, and product choice interact. These brief notes explain decisions we made on Milton, Mississauga, and Oakville projects so you can anticipate the same checkpoints at your home.
- Milton two-story infill: Mixed red/orange brick; gutters dumped at a corner causing efflorescence. We extended downspouts, repointed mortar, used mineral-silicate paint for superior breathability, and achieved a matte, even white.
- Mississauga side-split: Sound but glossy prior sealer. We performed a gentle wash, scuff-etched slick spots, applied an alkali-resistant primer, and finished with breathable acrylic for consistent sheen.
- Oakville addition tie-in: Old-and-new brick looked patchy. We limewashed to blend character, then applied a clear breathable topcoat to stabilize patina.
- Garage elevation pairing: White-painted brick with a flake epoxy garage floor. Coordinated whites and careful masking delivered a cohesive entry that resists tire marks and splashback.
Details that sell the look: tight cut lines at soffits and sills, proper back-brushing into joints, and thoughtful staging so landscaping stays pristine throughout the project.
Frequently Asked Questions
These concise answers resolve common concerns about breathability, durability, reversibility, and primer choice so you can move forward with confidence.
Will paint trap moisture in my brick?
Not if you use breathable, masonry-rated systems on dry, clean walls. Alkali-resistant primer plus compatible topcoats allow vapor to pass while shedding bulk water. Fix leaks and replace failed exterior caulking first to keep moisture out of the wall assembly.
Is painting a brick house white reversible later?
Fully removing paint is difficult and may scar softer brick. If future flexibility matters, consider limewash or masonry stain. Always test a discrete area to preview appearance and removability before committing.
How long will a white brick finish last?
With correct prep and breathable coatings, you can expect multi-year performance between repaints. South- and west-facing walls weather fastest. Gentle yearly washing and quick touch-ups at grade prolong the fresh look.
Do I really need to prime brick before painting it white?
Yes. An alkali-resistant masonry primer promotes adhesion and uniform sheen, especially on new, chalky, or previously sealed brick. Spot-prime stains first, then install two thin finish coats for even coverage.
Conclusion & Next Steps
A durable white-brick transformation rests on three anchors: dry masonry, breathable systems, and disciplined sequencing. Add climate-smart timing in Milton, and you’ll get the crisp curb appeal you pictured—without surprises during the next freeze–thaw cycle.
Key takeaways
- Moisture control and breathability are non-negotiable for painted brick.
- Use alkali-resistant primer and two thin, compatible finish coats.
- Schedule during stable, dry weather; protect landscaping and adjacent finishes.
- Adopt a simple maintenance rhythm for long-lasting brightness.
Next steps
- Walk your home: check gutters, grade, mortar, and existing coatings.
- Pick your look: opaque acrylic/mineral-silicate, limewash, or stain.
- Book a quick on-site assessment for moisture testing and system selection.
Soft CTA: Have questions about your brick’s condition? Our team in Milton and Mississauga offers a free estimate visit and color consultation. We also coordinate adjacent work—power washing, exterior window caulking replacement, and even deck sanding/staining—so your refreshed façade ties together beautifully.