


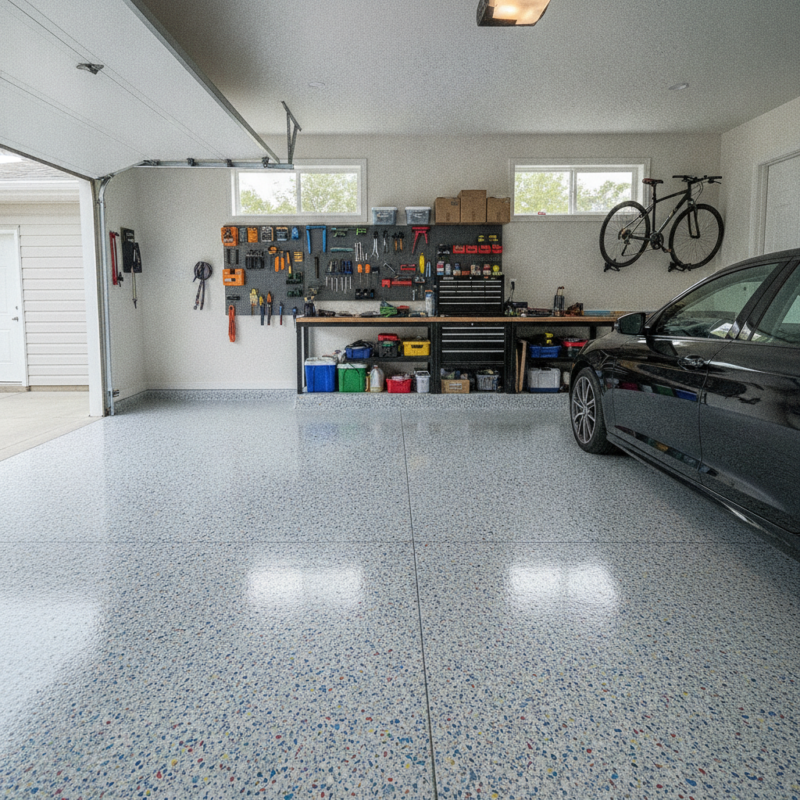
Epoxy flake floor installation is a multi-layer system that bonds epoxy to prepared concrete, broadcasts decorative vinyl flakes for slip resistance, and seals everything with a clear topcoat. Proper grinding, repair, and cure timing create a surface that resists road salt, hot tires, oil, and daily wear in Milton and Mississauga garages.
By ZIKRIA MUJAHID — Home Painter Services | Last updated: 2026-07-13
Milton/Mississauga install timing that actually works
Freeze–thaw cycles and highway salt loads matter here. We schedule installs after the spring thaw when slabs dry out, dehumidify during July humidity spikes, and pre‑heat unheated garages in winter so primers bond. Near Walker Park, clay and trail grit get tracked in—our crews pre‑sweep, then grind for a clean profile.

Overview
An epoxy flake system bonds mechanically and chemically to your concrete, adds colored chips for grip and style, and locks it all under a clear, UV‑stable topcoat. The make‑or‑break is prep: diamond grinding and moisture control. Done right, it handles salt, oil, and hot tires without peeling.
You’ll hear the grinder before you see the floor transform—that sound is adhesion being built. We capture dust with HEPA extraction, shield drywall and base, and cut clean lines at the garage door. If you want a full refresh, our painters can roll fresh wall color while the floor cures—masking is already up, so it’s efficient.
Local considerations for 316 Bergamot Ave
- Spring thaw leaves slabs damp. We test for moisture and, if needed, use a moisture‑tolerant primer and dehumidifiers before coating.
- Highway 401 salt tracked on tires can flash‑rust bare spots. We neutralize and rinse before grinding, then rinse shop‑vacs to keep chloride dust out.
- Unheated garages sit cold. We measure slab temperature—not just air—to meet manufacturer cure windows and avoid under‑cure.
What You Need Before You Start (Prerequisites)
Confirm the slab is dry, clean, and structurally sound. You need CSP 2–3 profile from diamond grinding, routed and filled cracks, oil removal, and stable temperature/humidity. Lock in a full day for coatings plus cure time. Skipping any of these steps risks peeling and hot‑tire pickup.
In our Milton and Mississauga projects, nearly every failed kit we’ve re‑done shared one thing: no mechanical profile. Acid etching is a shortcut that fails on dense or power‑troweled slabs. We grind. Period.
- Moisture: Quick plastic‑tape test overnight: condensation or darkened patches signal moisture. Persistent damp requires drainage fixes or a moisture‑tolerant primer.
- Oil removal: Degrease, rinse, then grind. Oil trapped in pores blocks primer wet‑out.
- Repairs: Route cracks to a “V”, fill with epoxy repair mortar, and shave flush. Feather spalls so flakes don’t telegraph edges.
- Climate window: Target 60–80°F with modest humidity. We pre‑heat in winter and dehumidify in summer to hit cure specs.
- Protection plan: Mask walls, steps, and doors; plan traffic paths and staging so nobody walks sand onto wet coats.
Our broader residential prep standards apply here: better prep, better finish. If you’re comparing surface treatments outdoors, our teams also apply exterior stain on decks and fences with UV‑protective sealants.
Tools and Materials for Epoxy Flake Floor Installation
A walk‑behind grinder with diamonds, HEPA dust extraction, epoxy crack repair, high‑solids epoxy primer/base, full‑broadcast vinyl flakes, and a UV‑stable clear coat form the core kit. Roll to specified mil thickness and respect pot life and recoat windows for a flat, durable finish.
Essential equipment
- Grinding: Planetary or single‑head grinder, 30/40 grit metal‑bond diamonds, and edge grinder.
- Dust control: HEPA extractor, tight hose seals, and pre‑filters changed between passes.
- Repair tools: Crack chaser blade, trowels, shavers, and mixing paddles.
- Application: Notched squeegee, 3/8″ rollers, spike shoes, calibrated buckets, and a low‑speed drill mixer.
Coatings and consumables
- Primer: High‑solids penetrating epoxy (5–8 mils wet). Wet‑out is the goal.
- Base coat: 100% solids or high‑solids epoxy (10–12 mils wet) matched to flake loading.
- Flakes: Vinyl color chips, full broadcast (~1 lb/sq ft) for a uniform “terrazzo” look.
- Clear coat: Aliphatic polyurethane or polyaspartic (6–8 mils). Polyaspartic cures faster and resists UV better.
- Alternatives: Retail kits (e.g., Rust‑Oleum EpoxyShield) work on small, dry bays. For bigger or damp slabs, industrial‑grade systems win.
For a primer on system choices, see this commercial epoxy overview. And if chronic moisture is your battle, a grind‑and‑seal approach can be a practical interim solution.
Want more on how these choices affect longevity? Our epoxy flooring guide breaks down coverage rates, cure windows, and common pitfalls (minus the sales fluff).
Step-by-Step Epoxy Flake Floor Installation
Grind to profile, repair defects, prime, roll the base coat, broadcast flakes, scrape/vacuum, then seal with a UV‑stable clear. Keep dust off wet coats, watch pot life, and hit recoat windows. These steps produce a dense, bright, stain‑resistant surface.
- Protect and stage. Mask walls, steps, and doors. Lay protection at thresholds. Stage mixing, flake buckets, and vac hoses so foot traffic never crosses wet coating.
- Diamond grind. Open pores to CSP 2–3. You’ll see a uniform scratch pattern replace the slick gray. Edge grind tight to walls. Vacuum thoroughly between passes.
- Repair. Route cracks, fill with epoxy repair mortar, and shave flush. Re‑grind repaired areas for uniform profile.
- Prime. Mix the primer to spec. Roll 5–8 mils wet until the slab looks evenly darkened—no dry, chalky patches.
- Base coat. Mix in small batches that fit the pot life. Squeegee and back‑roll 10–12 mils wet. Keep a wet edge and work out of the exit.
- Broadcast flakes. Throw chips upward so they “rain down” for even coverage. Full broadcast (~1 lb/sq ft) hides minor variations and boosts traction.
- Scrape and seal. After cure, scrape both directions to knock down peaks, vacuum, then apply a 6–8 mil polyaspartic clear for UV stability and fast return to service.
Sensory check: the floor goes from chalk‑matte (post‑grind) to satin (primer) to glossy speckle after the clear. If you see craters or dry roller marks, pause. Those are early warning signs to fix before moving on.
If you’d like the rest of the space to match, our crew can paint garage drywall and trim while the floor cures—masking is already in place. Many Milton clients choose a light gray wall and bright white trim so the new floor pops. See options in our home painting projects.

Common Problems and How to Fix Them (Troubleshooting)
Most issues trace to moisture, contamination, or missed timing. Re‑establish profile by grinding, switch to moisture‑tolerant primers when needed, clean aggressively, and hit recoat windows. Use UV‑stable clear to prevent ambering in sun‑exposed areas.
What goes wrong—and the fix
- Peeling or hot‑tire pickup: Adhesion or under‑cure problem. Regrind to sound concrete, re‑prime, and allow full cure before parking.
- Fish eyes/craters: Contamination. Degrease thoroughly, rinse, and re‑grind. Replace roller covers and trays. Keep silicone and tire shines away from the workspace.
- Uneven flake distribution: Broadcast too low or too late. Toss upward for rain‑like fall; scrape in two directions to level texture.
- Ambering/yellowing: Switch to aliphatic polyurethane or polyaspartic topcoats; avoid aromatic urethanes in sunlit bays.
- Telegraphing cracks: Route and fill with epoxy mortar before base coat. Do not rely on thickening the body coat—it won’t bridge movement.
- Blush (waxy film): High humidity during cure. Wash with warm water and mild detergent before recoating; control humidity next time.
If moisture is persistent or you’re working toward an eventual coating, a grind‑and‑seal process can stabilize dust and staining until drainage or vapor issues are solved.
DIY vs. Hiring a Professional in Milton
DIY works on small, dry, newer slabs if you can rent a grinder, control dust, and follow cure windows. Hire pros for moisture, repairs, or fast turnaround—crews bring planetary grinders, HEPA extraction, industrial epoxies, and UV‑stable polyaspartics that return garages to service quickly.
| Factor | DIY | Home Painter Services |
|---|---|---|
| Prep quality | Rental grinder; learning curve | Planetary grinding, tight dust control |
| Repairs | Basic fillers | Routed cracks, epoxy mortars |
| Coatings | Retail kits (e.g., EpoxyShield) | High‑solids epoxy + UV‑stable polyaspartic |
| Timing | Weekends | Streamlined crew workflow |
| Finish | Varies | Even flake, crisp cut lines |
| One‑stop upgrades | N/A | Walls, trim, cabinets, exterior stain in same project plan |
Our stance: acid etch is out; grinding wins. For topcoats, polyaspartic beats polyurethane for fast return‑to‑service and UV stability in sun‑exposed bays. Many DIYers watch Stone Coat Countertops or Concrete Floor Supply tutorials and still call us—because the tricky part isn’t rolling paint, it’s getting the slab right.
Hiring checklist for Milton homeowners
- Ask how the slab will be profiled (expect “diamond grinding,” not “acid etch”).
- Confirm flakes are full broadcast at roughly 1 lb/sq ft for a uniform terrazzo look.
- Request cure windows in writing (e.g., foot traffic ~12–24 hours, vehicles ~72 hours at 70°F).
- Check directories to gauge local presence (e.g., regional epoxy listings), then verify references and recent photos.
- Look for coordinated services: fresh wall paint or exterior touch‑ups while the masking is up saves time and disruption.
Want a fuller picture before deciding? Compare notes in our local epoxy overview and our deeper installation guide. If the driveway or walkway needs cleaning first, our crews can stage driveway reseal prep and sealing around the same timeline.
Free estimate + on‑time completion: We assess moisture, grind to profile, and lay out flake blends that hide stains and add traction. While the floor cures, we can refresh garage walls, doors, or even schedule exterior stain on decks and fences—one coordinated plan.
See Milton/Mississauga results or request your visit today.
Key takeaways
- Grinding beats etching—adhesion starts with a real concrete profile.
- Full broadcast (~1 lb/sq ft) evens color, hides repairs, and boosts traction.
- Polyaspartic clear shortens downtime and resists UV better than basic polyurethane.
- Control slab temperature and humidity; don’t rush recoat windows.
- Bundle upgrades while masking is up—walls, trim, even cabinet spray work.
Frequently Asked Questions
Most garages are walkable in 12–24 hours and ready for vehicles around 72 hours at 70°F. Winter installs work if slabs are dry and warmed. Cleaning is simple—sweep grit and wash with a mild, pH‑neutral cleaner.
How long before I can park on the new floor?
Plan on light foot traffic in 12–24 hours and vehicle traffic after about 72 hours at 70°F, depending on resin and humidity. We post clear signage and confirm readiness before you roll in.
Can you install epoxy flake floors during winter?
Yes—if the concrete is dry and the slab is warmed. We pre‑heat garages, test for moisture, and use cure schedules suited to cool conditions so primers and topcoats bond properly.
What’s the best way to clean the surface?
Sweep or blow off grit often and wash with a pH‑neutral cleaner and soft brush. Skip harsh solvents and abrasives. After winter, a hose‑down removes salt and keeps gloss bright.
Why choose polyaspartic for the clear coat?
Polyaspartic cures faster and resists UV yellowing better than many basic polyurethanes. In sunny, south‑facing Milton bays, that means quicker return to service and better long‑term clarity.
Ready to see it on your slab? If you’re near 316 Bergamot Ave in Milton or in Mississauga, we’ll test, grind, and install a full‑broadcast epoxy flake floor—then refresh walls while it cures. Book your free estimate today.
