


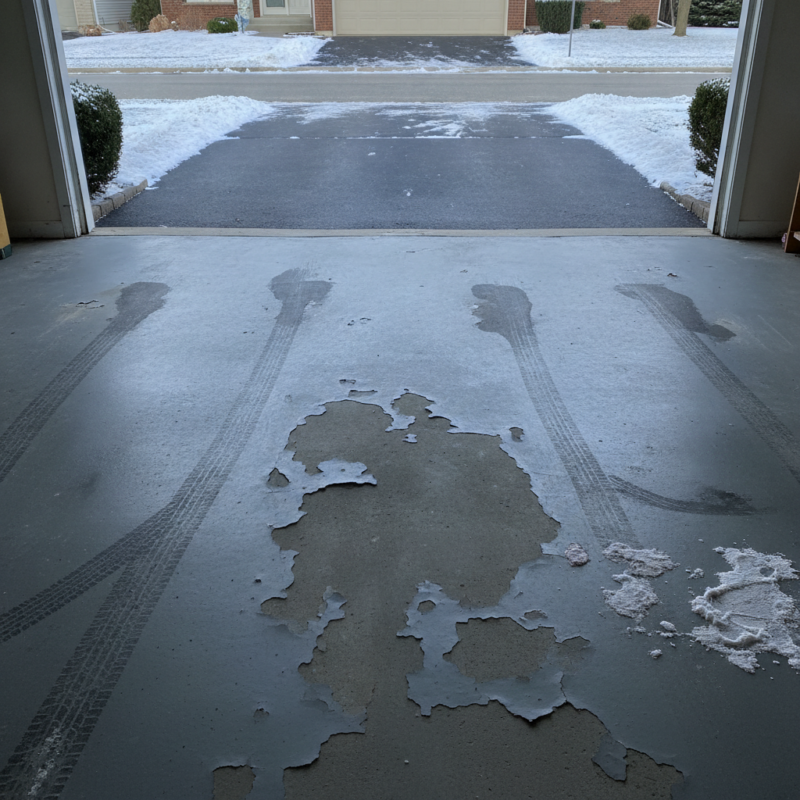
Epoxy garage floor peeling is the lifting, flaking, or bubbling of a coating where it lost adhesion to concrete. It points to issues like trapped moisture, weak surface prep, or thin, low‑solids products. Around Mississauga and Milton, freeze–thaw cycles and tracked road salt speed up failures, so fixing them early prevents bigger delamination and staining.
By ZIKRIA MUJAHID — Home Painter Services • Last updated: 2026-07-12
| Service area | Mississauga, Milton, and Oakville (GTA) |
|---|---|
| Core specialty | Garage Epoxy Flooring with diamond grinding prep |
| Free estimate | Yes — on-site assessment |
| On-time completion | Guaranteed scheduling commitment |
| Hours | Mon–Sat 7:00–20:00; Sun 7:00–18:30 |
Milton–Mississauga winter tip for salt season
When the first heavy salting hits, lay runner mats and a containment mat where your car drips. Rinse the garage apron weekly. Homes near Walker Park and the Tremaine at Bergamot stop see more foot traffic—extra mats keep grit off fresh coatings.
Overview: what you’re seeing and the fastest path to a fix
If you open the door and find chunks stuck to your tires, that’s epoxy garage floor peeling from weak adhesion. Start by mapping loose areas, moisture‑testing the slab, and deciding patch vs recoat. Small spots grind and patch well; widespread hollow sounds call for a full grind and recoat.
- Red flags you can spot: bubbles the size of coins, edges curling where tires turn, powdery concrete under lifted film.
- Quick homeowner test: tap suspect zones with a rubber mallet; hollow echoes mean hidden delamination.
- Your immediate to‑do: keep salt and meltwater off the area, and avoid tight turning on weak spots until repaired.
Why Epoxy Garage Floors Peel (The Real Causes)
Peeling happens when adhesion fails from moisture, insufficient surface profile, contamination, or thin chemistry. Hot tires and deicing salts widen weak spots. Diamond grinding to ICRI CSP 2–3, moisture control, and a matched primer/topcoat system prevent early delamination.
You feel it on day one of winter: the car rolls in, steam rises, and the floor pops. We regularly see these culprits across the GTA:
- Moisture vapor: Coating over damp slabs forms blisters. Our go/no‑go: in‑situ RH above ~80% triggers a moisture‑tolerant primer, not a standard one.
- Undersized profile: Acid etch leaves weak laitance. We grind to a uniform ICRI CSP 2–3 so epoxy keys in mechanically.
- Contamination: Oil, silicone tire dressings, or curing compounds block bond. Degreasing plus mechanical prep are non‑negotiable.
- Thin films: DIY kits often leave ~3–8 mils dry; our recoats target ~18–24 mils base/build plus a 2–4 mil UV‑stable topcoat.
- Salt + freeze–thaw: Chlorides penetrate microcracks. Repeated freeze‑thaw wedges edges open and spreads peeling.
Want to understand why a grind matters? This local grind‑and‑seal overview walks through profiling concrete so coatings actually lock in, not just sit on dust.
We carry that same prep discipline across our work—from power washing guidance that supports clean substrates to our driveway sealing tips that cut salt transfer into your garage.
Can You Fix a Peeling Epoxy Floor — or Does It Need Full Removal?
Patch isolated failures by grinding to sound concrete, degreasing, priming, and recoating. If about 20–30% or more is loose—or you hear wide hollow zones—full removal by diamond grinding and a complete recoat delivers the stable, long‑term result.
- Patchable: one or two hot‑tire spots, small apron chips, or minor lift at a saw‑cut line.
- Recoat required: gummy film, widespread bubbles, moisture under the coating, or repeat failure after DIY touch‑ups.
- Moisture metric: if MVER is ~3–5 lb/1,000 sq ft/24 hr or in‑situ RH is ~80%+, we spec a moisture‑tolerant primer.
During epoxy visits we also watch for driveway sealing opportunities (less salt tracked in) and failing exterior window caulking around the garage frame—both reduce water intrusion that undermines coatings.
How to Fix a Peeling Epoxy Garage Floor (Step-by-Step)
The durable repair removes failed resin, restores the concrete profile, and installs a compatible, thicker system. Control dust, verify moisture, and follow recoat windows. Grind to clean concrete, prime correctly, then seal with a UV‑stable topcoat built for hot tires and salt.
- Isolate and clean: Empty the garage, mask doors/steps, and HEPA‑vacuum dust so it doesn’t contaminate fresh resin.
- Moisture check: Run calcium chloride or in‑situ RH tests. Fix downspouts, slab leaks, or vapor issues before coating.
- Mechanical removal: Scrape blisters; diamond grind to sound concrete (edge‑grind along walls and steps).
- Degrease and rinse: Use a concrete‑safe degreaser; rinse and dry thoroughly. No damp spots before priming.
- Crack and pit repair: Fill with epoxy mortar or polyurea patch; feather edges flush.
- Prime: Roll a moisture‑tolerant epoxy primer matched to slab conditions.
- Build coats: Apply high‑solids epoxy; optional flake broadcast adds grip and camouflages wear.
- Topcoat: Seal with a UV‑stable polyaspartic or polyurethane. Typical recoat windows run ~8–24 hours at ~70°F (follow product data).
Substrate‑first thinking applies across trades. This short note on surface preparation shows why cleaning and profiling outlast quick fixes.

While we’re onsite, our team can also spot popcorn ceiling issues in adjacent mudrooms or recommend a deck and fence exterior stain schedule so salt and sun don’t undo your curb appeal.
Why Most DIY and Budget Epoxy Jobs Fail Within 2 Years
DIY kits often skip moisture testing and rely on thin, low‑solids films. Acid‑etch only prep leaves weak laitance, and no UV‑stable topcoat means hot tires and salt win. Professional grinding, moisture‑tolerant primers, and higher‑solids systems outlast quick fixes.
- Film build: Kits often net ~3–8 mils dry; pro systems target ~20+ mils total for better hot‑tire resistance.
- Prep shortcuts: Etch‑and‑go doesn’t remove sealers, densifiers, or silicone residues.
- Chemistry mismatch: Water‑based “epoxy paints” can soften under tire heat; industrial epoxies hold up.
- No UV guard: Without a UV‑stable topcoat, color chalks and micro‑paths open for moisture.
For cleaning adjacent areas, our power washing best practices explain how we prep siding and concrete without driving water where it shouldn’t go.
What a Professional Epoxy Recoat Looks Like (and What to Ask For)
Expect dust‑controlled diamond grinding, moisture evaluation, an industrial primer, high‑solids epoxy build, optional flake, and a UV‑stable topcoat. Ask for written prep steps, product data sheets, recoat windows, and a clear schedule commitment.
- Preparation: Full‑floor grind to CSP 2–3, calibrated edge work, and crack/pit repair for uniform adhesion.
- Materials: Industrial epoxy (not paint), moisture‑tolerant primer, and polyaspartic or polyurethane topcoat.
- Documentation: System spec sheets, cure and recoat windows, and simple aftercare.
- Scheduling: Staged access so you can walk and then park on predictable timelines.
To see how pros outline scope locally, browse this concise epoxy contractor profile and compare the prep detail to what’s on your proposal.

Our approach meshes with other services: exterior window caulking replacement to seal out wind‑driven rain, and driveway sealing to cut chloride transfer—two small moves that protect your floor year‑round.
Peeling Epoxy in Mississauga & the GTA: What Local Conditions Make It Worse
Local garages face unheated slabs, tracked deicing salts, and humid summers. Water migrates through slabs, salts attack the bond line, and parked‑car heat shears thin films. Many Milton new builds sit on clay‑heavy soils that hold moisture—stronger prep and chemistry are essential.
- Clay‑rich subgrades: Newer Milton subdivisions can trap moisture under slabs, increasing vapor drive in shoulder seasons.
- Older Mississauga pours: Saw‑cut joints telegraph movement; thin films tear at turn‑in points by the door.
- Humidity swings: Summer condensation under cars blisters weak films; winter freeze–thaw pries at edges.
Local considerations for 316 Bergamot Ave
- Prevailing winds along Tremaine blow grit into garages—sweep before coating so dust doesn’t weaken adhesion.
- Foot traffic to Walker Park brings fine soil; runner mats from the overhead door to the entry step help a ton.
- We often find drafty door frames; ask us to check exterior caulking while we’re onsite to stop wind‑driven moisture.
FAQ
What causes epoxy to peel under car tires?
Hot tires can soften thin or low‑solids films, while moisture and contaminants weaken adhesion. Without a proper concrete surface profile (from grinding) and a UV‑stable topcoat, the film shears and lifts where you turn and park.
Can I repair just one peeling spot?
Yes—if surrounding areas are firmly bonded. Remove loose resin, grind to clean concrete, degrease, prime the patch, then install compatible epoxy and a protective topcoat. If nearby zones sound hollow when tapped, plan for a broader recoat.
Is acid etching enough before epoxy?
Usually not. Etching won’t reliably remove sealers, densifiers, or silicone residues, and it can leave a weak surface layer (laitance). Mechanical diamond grinding creates a consistent profile for stronger adhesion, especially in freeze–thaw climates.
How do I prevent peeling during winter?
Rinse the apron, use containment mats for snow and salt, and squeegee meltwater. Avoid silicone tire dressings, and maintain a UV‑stable topcoat. Quick cleaning after storms reduces chloride exposure and protects the bond line.
Key takeaways
- Numbers that matter: Grind to CSP 2–3; aim for ~20+ mils total build; use moisture‑tolerant primer if RH is ~80%+.
- Patch vs recoat: Spot‑fix isolated failures; grind and recoat if ~20–30% is loose or hollow.
- Local reality: GTA salt, humidity swings, and clay‑rich subgrades demand pro prep and chemistry.
- Cross‑service wins: Driveway sealing and exterior caulking reduce water and salt—the enemies of adhesion.
